Battle Plans

Swordland
Showdown

SWL1 · Legion 1 · 27 vs 12 SWL2 · Legion 2 · 14 vs 30

Two separate events. Independent strategies. Select your legion below.

SWL1

Legion 1

[APX]ArixPheXXyn #1886 · 27 vs 12 · Category C — Platinum

Battle Start: April 19 · 21:00 CEST (19:00 UTC)

27our players
vs
12enemy

👑 Command Structure

Overall Leader
Novaz
Strategy · Coordination · Final calls
Attack Captain
MaoMao
Commands all attack teams
⚔️ STRIKE → Flying Dutchman ⚔️ SUPPORT → FreekDaddy2 🗡️ HAVOC → Primal Hunter
Defence Leader
Novaz
Oversees all defence
🛡️ DEF 1 → Novaz 🛡️ DEF 2 → Noche

⚔️ Teams

🗡️

HAVOC

Whale hunters — solo attack non-stop. MaoMao coordinates targets with STRIKE.

  • Primal Hunter68LEAD
  • MaoMao79ATK Leader
  • Getlove57
⚔️

STRIKE

Burn cities directly. Phase 3: capture & hold Swordshrine until timeout.

  • Flying Dutchman77LEAD
  • Godfather72
  • VIXWitches70
  • La Reina del Sur60
  • Nova59
⚔️

SUPPORT ATTACK

FreekDaddy2 + CuttiePie protect DEF 1 · Duvy + Master + Slammin protect DEF 2. Phase 2: Merc Camp → Hall of Reformation → Undercella.

  • FreekDaddy256LEAD
  • CuttiePie54
  • Duvy53
  • Master37
  • Slammin31
🛡️

DEF 1

Left side — Bell Tower → left Sanctum + 2 Abbeys. Hold everything in Phase 3.

  • Novaz33LEAD · Overall Leader
  • arch30
  • NEVERMORE29
  • Lara_Salles27
  • SEHZADE OGO26
  • Netero24
🛡️

DEF 2

Right side — Royal Stables → right Sanctum + 2 Abbeys. Safe zone. Akroma & Hahahahh unconfirmed.

  • Noche60LEAD
  • MaO24
  • OFF3S1VE23
  • Ethan21
  • King Of Disaster24
  • Lord JC17
  • Akroma23unconfirmed
  • Hahahahh26unconfirmed

🏆 Phase 3 — Building Priority

Points per minute — hold what scores most, not what you captured first.

Priority 1
2× Sanctum
6,000 p/min each
= 12,000 p/min
Priority 1
4× Abbey
3,000 p/min each
= 12,000 p/min
Priority 2
Swordshrine
9,000 p/min
Rally + flood
Low priority
Bell Tower
Abandon in Phase 3
Once Sanctums locked
Low priority
Royal Stables
Abandon in Phase 3
After teleport used

📋 Phase Plan

Phase 1
Opening Rush
  • HAVOC Stalk whales — solo attack non-stop until wiped
  • STRIKE Burn city directly — anyone stealing our buildings
  • SUPPORT ATK FreekDaddy2 + CuttiePie protect DEF 1 · Duvy + Master + Slammin protect DEF 2
  • DEF 1 Novaz → Bell Tower · rest → Left Sanctum immediately. Garrison rally Sanctum, 2nd march → Bell Tower
  • DEF 2 Noche leads — rush + garrison Royal Stables (south)
Phase 2
Map Control
  • HAVOC Keep burning — wipe whales + small castles
  • STRIKE Burn recapturers. If enemy captured first — burn to force garrison out
  • SUPPORT ATK 1. Merc Camp (north) · 2. Hall of Reformation (south) · 3. Undercella (flex). Keep protecting DEF sides
  • DEF 1 Hold Bell Tower + Left Sanctum → then Abbey 1 + Abbey 2. Share garrisons as needed
  • DEF 2 Right Sanctum + 2 Abbeys — hold garrisons. Call STRIKE if attacked
Phase 3
Swordshrine ⚔️
  • STRIKE Flying Dutchman leads — teleport, capture Swordshrine, hold garrison until timeout
  • HAVOC Teleport to centre — burn anyone stealing Swordshrine
  • SUPPORT ATK Hold Merc Camp + Hall + Undercella. Spare troops → Swordshrine/Abbey
  • DEF 1 HOLD EVERYTHING — wait for STRIKE on Swordshrine
  • DEF 2 HOLD EVERYTHING — wait for STRIKE on Swordshrine
STRIKE starts → HAVOC burns → SUPPORT floods

📌 Key Rules

  • ✓ Join every rally called
  • ✓ Stay garrisoned unless ordered otherwise
  • ✓ Communicate — report attacks and teleports
  • ✓ Burn enemy city if they steal your building
  • ✗ Never solo fight
  • ✗ Never leave buildings empty
  • ✗ Don't chase enemy into safe zone
  • ✗ No random rallies — wait for signal
⏸️ On Cooldown

Watch map → report enemy teleports → spot empty cities → tell HAVOC

💬 Quick Commands

Paste in game chat

  • 🛡️ HOLDDon't leave your building
  • 🔁 REINFORCE [building]Everyone available now
  • ⚔️ RALLY on [player]Join in 10 seconds
  • 🔥 BURN [player city]They stole our building — burn now
  • 🏁 PHASE 3Swordshrine push — follow STRIKE
  • 🎯 TARGET: [name]Focus this player NOW
  • 🐋 WHALE SPOTTED: [name]HAVOC intercept immediately

✅ Pre-Match Checklist

Complete before battle starts
🏆 VICTORY 450,460 vs 0 [APX]ArixPheXXyn beat [KsR]OLYMPUS
MVP Deathliger Game official MVP · Co-Leader
SWL2

Legion 2

[APX] Legion 2 · 14 vs 30 · Category C — Gold · Enemy avg badge ~23

Battle: April 19 · 16:00 CEST · ✅ COMPLETED — WE WON

14our players
vs
30enemy
💪
Individual advantage

Enemy max badge ~36. Only 1–3 have T8 — most are max T7. Hold buildings with confidence.

🏛️
Phase priority

Sanctums first (12k p/min) → Swordshrine (9k p/min) → Abbeys (12k p/min). Points win this.

🎯
Plan A — Split 3+2

3 groups of 4 cover 9 buildings. 2 castle harassers drain enemy healing so they can't fill rallies.

⏱️
Stay calm

1 hour fight. We are stronger individually. Coordinate and we dominate — don't panic at their numbers.

📋 Plan A — Final Confirmed Strategy
3 Groups × 4 Members

ATK = attack anyone trying to steal (send 1 troop or small rally to join garrison)
DFD ×3 = capture and garrison the building

🔥 TOP 2 — Dark Lord + brucewayne

Attack lower-rank enemy castles until their troops are wiped out. They can't fill rallies or defend if their castle is burning. Also burn anyone stealing our buildings.

🏆 Priority = Points

Always prioritize the building that gives most points. Sanctums first, then Swordshrine, then Abbeys. Don't waste energy holding low-value buildings late game.

🍻 Have fun!

We're stronger individually. Coordinate, hold buildings, and enjoy the match. This is winnable.

👑 Command Structure

Overall Leader
TBD
Assign before battle
🤝 Co-Leader → Deathliger 🤝 Co-Leader → Lady Skarlett
🔥 TOP 2 — Castle Harassers
Dark Lord + brucewayne
Burn lower-rank castles until troops wiped. Burn anyone stealing our buildings.
🔄 Backup → TheRipper ⚠️ If Group 3 no-show → Deathliger + Lady Skarlett join TOP 2
🛡️ DEF Captain
Lord X
Commands all DFD×9 defenders across all 3 groups
⚔️ ATK lead Grp 1 → TheRipper

⚔️ Teams

🔥

TOP 2 — Castle Harassers

Burn lowest-rank enemy castles until troops wiped. Drain healing so enemy can't fill rallies. Burn anyone who tries to steal our buildings.

  • Dark Lord75TOP 2
  • brucewayne66TOP 2
  • TheRipper65🔄 Backup TOP 2
🏆

Group 1

1 ATK (solo attacks) + 3 DFD (garrison + hold). ATK pushes buildings, DFD locks them down.

  • TheRipper65ATK
  • Lord X64DFD lead · DEF Captain
  • xFantooo60DFD garrison
  • M340i36DFD garrison
🏆

Group 2

1 ATK (solo attacks) + 3 DFD (garrison + hold). ATK pushes buildings, DFD locks them down.

  • jie66ATK
  • HongKongLawyer60DFD lead
  • BLACKPINK27DFD garrison
  • j3ttybear22DFD garrison
🏆

Group 3

1 ATK + 3 DFD. If missing players no-show → Deathliger + Lady Skarlett join TOP 2 as extra burners. Rae flexes to Group 1 or 2 (stay protected).

  • Deathliger64ATK · Co-Leader
  • Lady Skarlett62DFD lead · Co-Leader
  • Rae20DFD garrison 💖 protected
  • مسطول21DFD garrison
  • TBD?1 slot open
⚠️ Contingency — If Group 3 missing players no-show
  • 🔥 Deathliger + Lady Skarlett → join TOP 2 as extra burners (3 harassers total)
  • 💖 Rae → flex to Group 1 or 2 garrison depending on situation (stay protected — enemy is your power level)
  • ✅ Groups 1 + 2 → self-sufficient, no changes needed

🏆 Phase 3 — Building Priority

Same scoring as SWL1 — but DEF must pivot aggressively since enemy will try to retake Bell Tower / Royal Stables with numbers.

Priority 1
2× Sanctum
6,000 p/min each
= 12,000 p/min
Priority 1
4× Abbey
3,000 p/min each
= 12,000 p/min
Priority 2
Swordshrine
9,000 p/min
Dark Lord leads
Low priority
Bell Tower
Abandon in Phase 3
Pivot to Sanctum
Low priority
Royal Stables
Abandon in Phase 3
After teleport used

📋 Phase Plan

Phase 1
Opening Rush
  • TOP 2 Burn lowest-rank enemy castles — wipe their troops early
  • ATK×3 Rush + solo attack Sanctums. After each attack → garrison Sanctum/Abbey for personal points
  • DFD×9 Follow ATK — capture and garrison Sanctums. Hold position.
Phase 2
Map Control
  • ATK×3 Solo attack Swordshrine (9k p/min). After each → garrison Swordshrine/Abbey for personal points
  • DFD×9 Hold Sanctums. Call for help early — don't try to hold alone.
  • TOP 2 Keep burning. When troops recover → garrison Sanctum/Abbey for personal points
Phase 3
Abbey Flood ⚔️
  • ATK×3 Flood all 4 Abbeys (12k p/min) — each group takes one. Garrison Abbey for personal points
  • DFD×9 Hold Sanctums. Abandon Bell Tower / Royal Stables — not worth it late game.
  • TOP 2 Capture + garrison extra buildings. Sanctum/Abbey/Swordshrine all give personal points
TOP 2 burns → ATK×3 pushes → DFD×9 holds

🌊 Anti-Swarm Protocol

  • ✓ Call rally support early — before you fall
  • ✓ Report enemy numbers in chat immediately
  • ✓ Burn enemy city if they steal your building
  • ✓ Rally hard — 14 players, every one counts
  • ✗ Don't spread too thin — can't hold 10 buildings
  • ✗ Don't solo hold vs 5+ enemies
  • ✗ Don't leave Sanctums for Swordshrine in Phase 3
⏸️ On Cooldown

Watch map → report enemy swarms → plan next move

💬 Quick Commands

Paste in game chat

  • 🛡️ HOLDDon't leave your building
  • 🔁 REINFORCE [building]Everyone available now
  • ⚔️ RALLY on [player]Join in 10 seconds
  • 🔥 BURN [city]They stole our building — burn now
  • 🌊 SWARM at [building]5+ enemy — need rally NOW
  • 🏁 PHASE 3Pivot to Sanctums + Swordshrine

✅ Pre-Match Checklist

Complete before battle starts

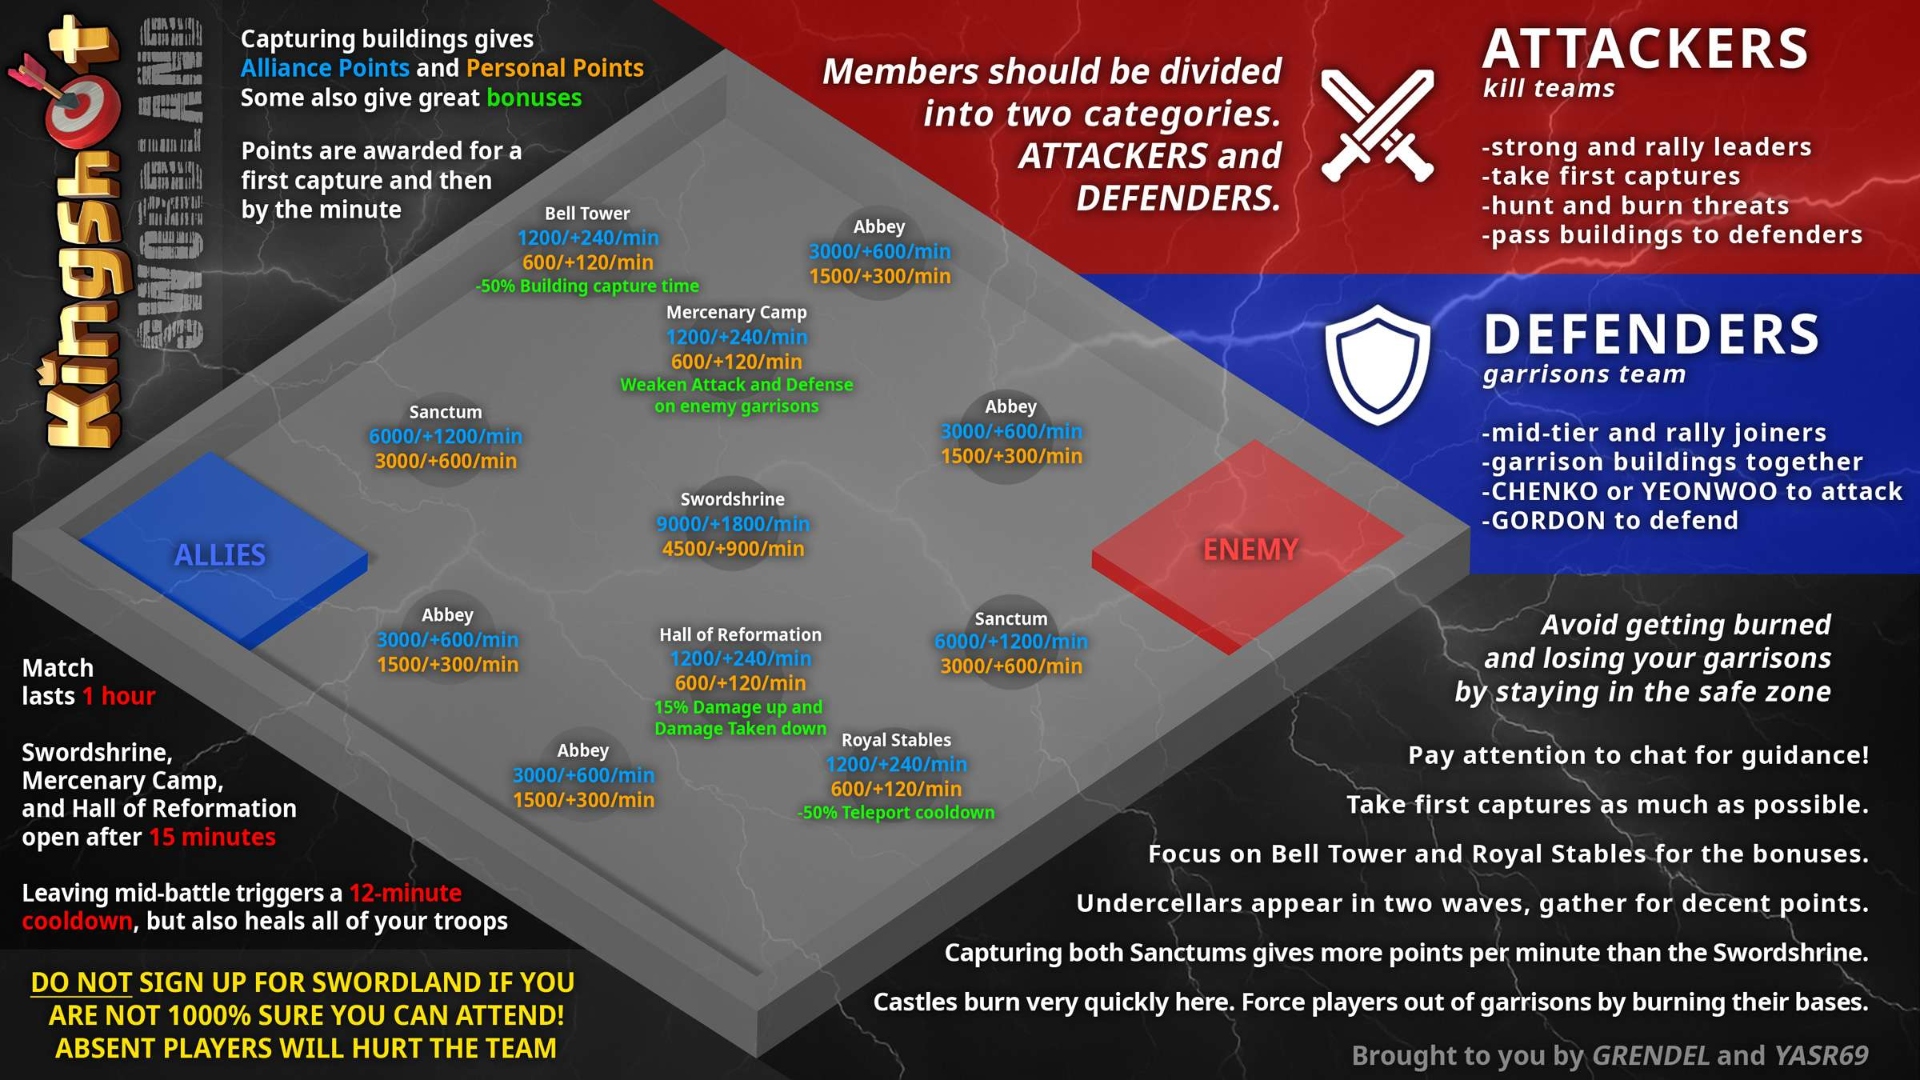
MAP

Buildings & Scoring

Sanctums 12k · Swordshrine 9k · Abbeys 12k · Bell Tower / Royal Stables → abandon Phase 3

Swordland Showdown — Building Map & Scoring
FAQ

Common Questions

Everything you need to know before the battle starts

⏱️ Cooldowns & Healing

How does the Leave Battlefield cooldown work?

If you tap the banner at the top and select Leave Battlefield, all your injured troops instantly heal — for free. But you cannot re-enter for 12 minutes.

Do not just close the battle screen or go to your city — that does not count as leaving. You’ll know it worked when you see the 12-minute countdown timer.

💡 Use this when your infirmary is full and you can’t keep up with healing speedups. Come back fresh with full troops.

Should I use healing speedups during the event?

Only if you have plenty to spare. The event gives you free healing speedups gradually over time — use those first.

Don’t waste speedups near the end of the battle — all troops heal automatically when the event ends anyway. Save the last 10 minutes, they’re not worth it.

💡 If you’re heavily injured mid-battle, Leave Battlefield is better than burning your speedups.

Can my troops actually die?

No. Troops cannot die during Swordland. Your hospital cannot fill up. All injured troops heal when you leave the battlefield or when the event ends. Fight without fear.

Should I heal while garrisoning a building?

You can send a second march to top up a garrison without recalling — the game adds troops to your existing garrison automatically. Use this if you took damage but don’t want to abandon the building.

If your garrison is too weak, recall it, Leave Battlefield to insta-heal, then re-garrison after the 12-min cooldown.

📍 Teleports & Movement

How does teleport cooldown work?

Free teleports accumulate over time during the event — 1 charge every 1 minute, capped at 10. Each gives a 25% march speed boost.

Royal Stables cuts the cooldown by 50% — that’s why we rush it at the start. More teleports = faster repositioning = more buildings captured.

💡 Don’t hoard teleports. Use them to get to objectives faster.

Can I be attacked in the safe zone?

No. The safe zone is completely untouchable. You can attack from it, but nobody can hit you back while you’re inside. DEF 2 players: stay in the safe zone and garrison nearby buildings from there.

My city is being burned — what do I do?

If your city catches fire and you don’t put it out with gems, it forces a teleport back to your base in about 10–20 seconds. You won’t lose resources — only get repositioned.

Options: 1) Quickly deploy troops to an empty tile nearby to absorb the attack. 2) Teleport away before they finish. 3) Recall your top 3 heroes if they’re enough to defend. 4) Accept the teleport — it’s not the end of the world.

🏗️ Buildings & Points

How long does it take to capture a building?

3 minutes after entering a building before you control it and start earning points. If you’re kicked out before 3 minutes, you get nothing.

Bell Tower cuts this to 1.5 minutes for all your buildings. That’s why we capture it first.

🚨 Always garrison immediately after entering — an undefended building can be solo’d before the 3 minutes are up.

What are those floating point packages on buildings?

When a building changes hands, 50% of stored alliance points drop on the floor as packages anyone can grab. If you see an enemy building with a big stack of points, attack it — even if you can’t hold it, you can collect the dropped packages first.

💡 Likewise, if we lose a building, rush to collect our dropped packages before the enemy grabs them.

What does Hall of Reformation do?

Gives your entire alliance a 15% damage boost and 15% damage resistance. This is massive in Phase 2 fights. SUPPORT ATK targets this for a reason — it makes every rally and garrison in our alliance stronger.

What does Mercenary Camp do?

Lets you send mercenaries to automatically attack enemy-held buildings, softening their garrisons without using your own troops. Good for applying pressure on multiple fronts at once.

What are Undercellars?

Hidden buildings that appear randomly in Phase 3. They give a quick burst of points to whoever grabs them. They’re scattered around the map — check the minimap (tap the magnifying glass icon) to find them. SUPPORT ATK is flex to grab these.

⚔️ Combat

Why burn a city instead of rallying their garrison?

Burning a city forces the defender to teleport away, instantly emptying their garrison. This is faster than a rally and costs fewer of your troops. Once their city is burning, retaking the building is easy.

Use the command BURN [player name] in chat when calling for this.

How does defensive garrison work — who leads it?

The game automatically picks the player with the highest stats in the garrison as the rally leader. Their heroes, gear, and buffs apply to everyone’s troops. This is why our strongest players lead key garrisons — their stats multiply everyone’s power.

DEF team members: always send your best heroes and troops when garrisoning. Even joiners contribute their top-right hero skill.

Should I spy before attacking?

Yes, always spy first. It shows you how many troops they have and whether they’ve been weakened. If an enemy has counter-recon, start a rally on them (don’t launch it) — you can see the garrison makeup in the open rally window, then cancel.

Do buffs matter in this event?

A lot. A 20% buff doesn’t add 20% — it multiplies your existing attack. If you had 500% attack, you end up at 600%, not 520%. Use all available buffs before major rallies.

The event also gives free 25% march speed boosts (up to 10 charges, 1 per minute). Use them freely.

📊 Personal Points

Personal points vs alliance points — what’s the difference?

Alliance points determine who wins the battle. Personal points determine your individual reward tier — they’re tracked separately and don’t hurt alliance score.

Best buildings for personal points: Sanctum > Swordshrine > Abbey. Garrison these whenever your main job has a pause.

When should I stop worrying about personal points?

Never sacrifice your team role for personal points. Personal points come in between your main tasks — when HAVOC is healing, when STRIKE is waiting on a cooldown, when DEF has a quiet moment. Always team role first.