Command Structure
Overall Leader
Novaz
Strategy · Coordination · Final calls
Attack Captain
MaoMao
Commands all attack teams
⚔️ STRIKE → Flying Dutchman
⚔️ SUPPORT → FreekDaddy2
🗡️ HAVOC → Primal Hunter
Defence Leader
Novaz
Oversees all defence
🛡️ DEF 1 → Novaz / Noche
🛡️ DEF 2 → TBD
Teams
HAVOC
Whale hunters — track enemy teleports, burn whoever lands. Always mobile, NEVER garrison
204badge total
- Primal Hunter68LEAD · HAVOC Captain
- MaoMao79Attack Captain + HAVOC
- Getlove57Confirmed HAVOC
STRIKE
Rally Leaders — start ALL rallies. Phase 3: lead Swordshrine. Backup HAVOC whale coverage.
336badge total
- Flying Dutchman77LEAD · STRIKE Captain
- Godfather72
- VIXWitches70
- La Reina del Sur60Experienced
- Nova59
SUPPORT ATTACK
Rally joiners + flex. Phase 1 help DEF capture. Phase 2 Merc Camp. Anti-steal burns. Phase 3 flood Swordshrine + Abbeys.
231badge total
- FreekDaddy256LEAD · R4
- CuttiePie54
- Duvy53
- Master37Active
- Slammin31
DEF 1 — Mobile Garrison
Bell Tower (north) → Sanctum East + Abbeys top-right · Has teleports
285badge total
- Novaz33LEAD · Overall Leader · R4
- Noche60
- arch30New player — garrison only
- NEVERMORE29
- Lara_Salles27Prefers defence
- SEHZADE OGO26R2
- Netero24
DEF 2 — Safe Zone Garrison
Royal Stables (south) → Sanctum West + Abbeys bottom · No teleports needed
166badge total
- Hahahahh26
- MaO24
- King Of Disaster24R1
- OFF3S1VE23R1
- Akroma23
- Ethan21
- Lord JC17
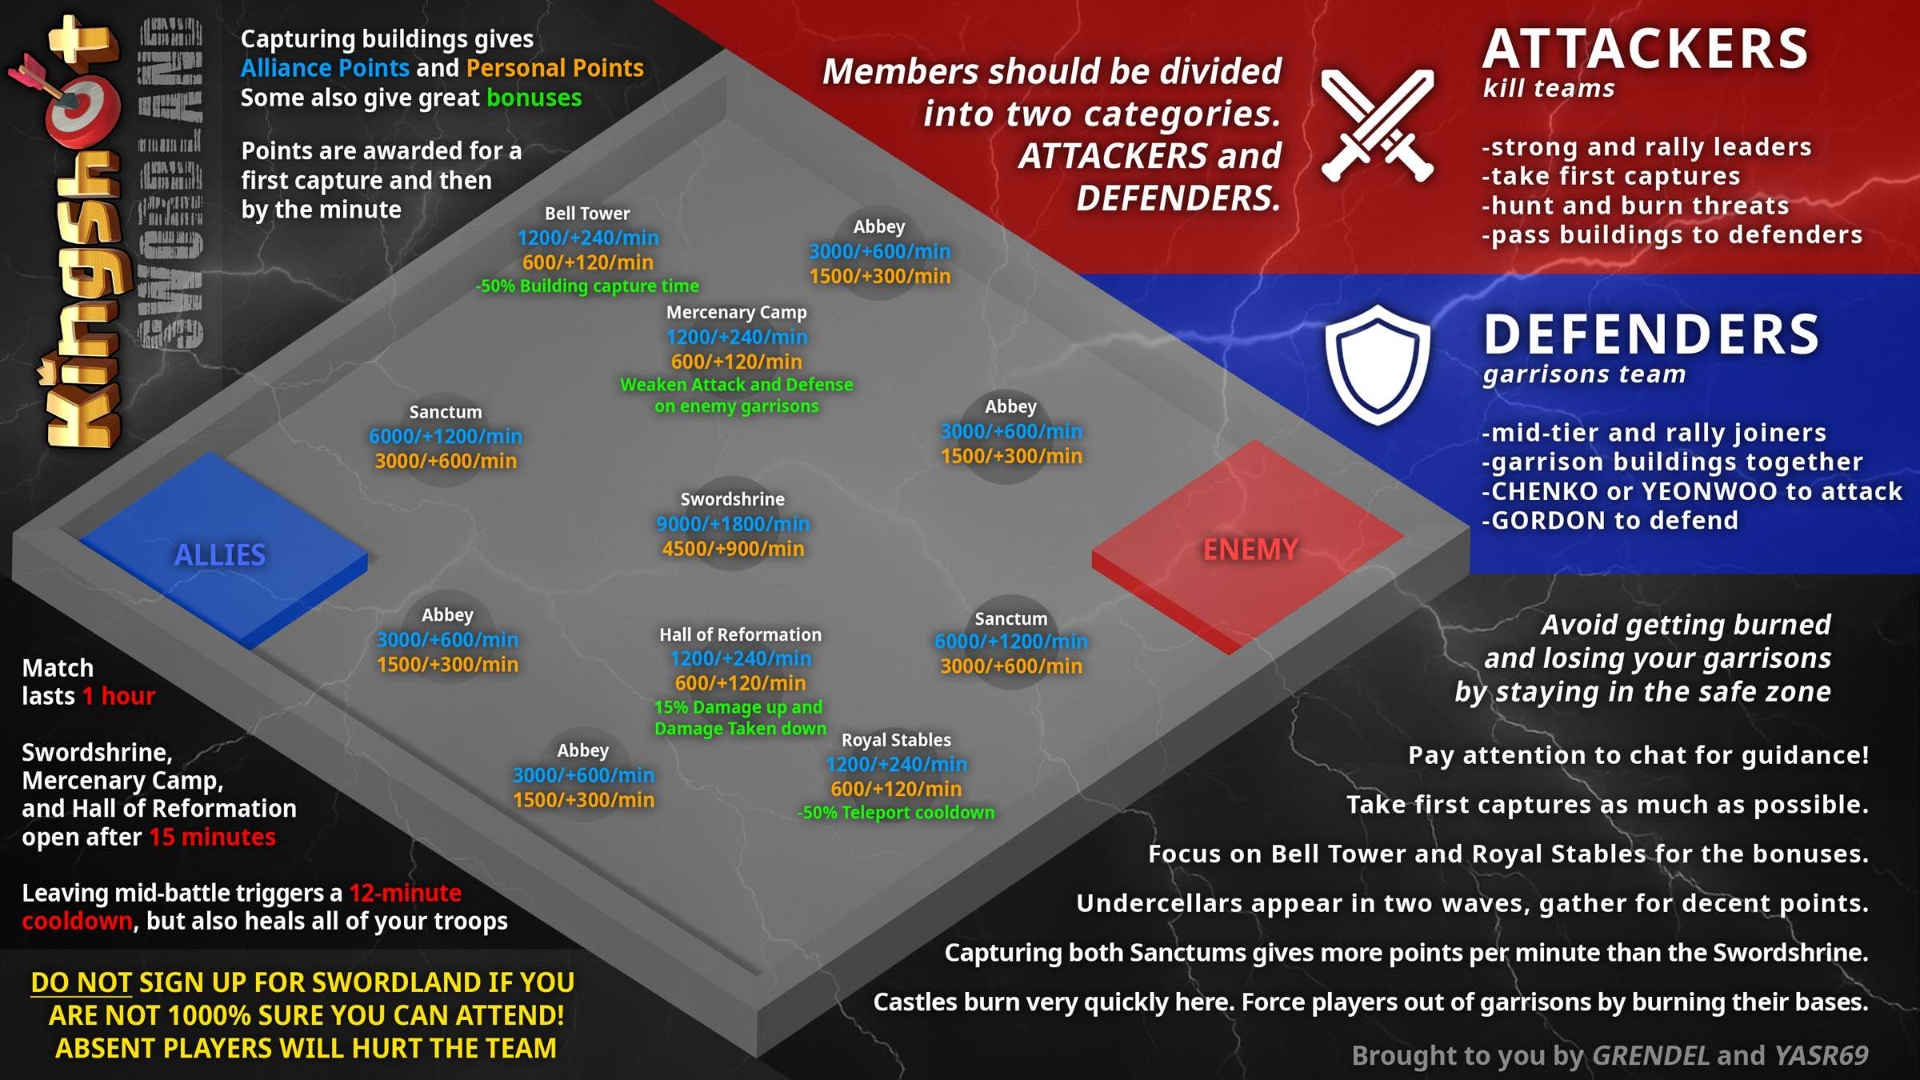
Phase 3 — Building Priority
Points per minute — hold what scores most, not what you captured first.
Priority 1
2× Sanctum
6,000 p/min each
= 12,000 p/min
Priority 1
4× Abbey
3,000 p/min each
= 12,000 p/min
Priority 2
Swordshrine
9,000 p/min
Rally + flood
Low priority
Bell Tower
Abandon in Phase 3
Once Sanctums locked
Low priority
Royal Stables
Abandon in Phase 3
After teleport used
Phase Plan
Phase 1
Opening Rush
- HAVOC Track enemy teleports, burn whoever lands
- STRIKE Start rallies on enemy's strongest immediately
- SUPPORT ATK Split 3+2 — help DEF 1 capture Bell Tower + DEF 2 capture Royal Stables
- DEF 1 Rush + garrison Bell Tower (north)
- DEF 2 Rush + garrison Royal Stables (south) from safe zone
Phase 2
Map Control
- HAVOC Continue burning, report empty enemy cities
- STRIKE Keep rallying — hit Merc Camp defenders. Burn recapturers.
- SUPPORT ATK Capture Merc Camp + Hall of Reformation + Undercellers
- DEF 1 Hold Bell Tower → push Sanctum East + Abbeys
- DEF 2 Hold Royal Stables → push Sanctum West + Abbeys
Phase 3
Swordshrine ⚔️
- STRIKE Flying Dutchman LEADS Swordshrine rallies (signal from Novaz)
- HAVOC Burn defenders inside after STRIKE rallies land
- SUPPORT ATK Flood Swordshrine + hold Abbeys — relic points here
- DEF 1 Hold Sanctum East + Abbeys. Abandon Bell Tower.
- DEF 2 Hold Sanctum West + Abbeys. Abandon Royal Stables.
STRIKE starts
→
HAVOC burns
→
SUPPORT floods
Special Protocols
🗡️ HAVOC Whale Protocol
Enemy likely has 2+ whales
- Primary job: Force enemy whales off buildings — burn/harass
- Don't chase into safe zone — wait and intercept when they teleport
- If HAVOC healing: STRIKE covers whale targets temporarily
- Track teleports — report locations in chat immediately
🔥 Anti-Steal Rule
If enemy takes our building
- ATK teams burn their city immediately
- City burn = auto-displaces enemy from garrison
- Defender re-captures much easier
- Command:
BURN [player city]in chat
Key Rules
- ✓ Join every rally called
- ✓ Stay garrisoned unless ordered otherwise
- ✓ Communicate — report attacks and teleports
- ✓ Burn enemy city if they steal your building
- ✗ Never solo fight
- ✗ Never leave buildings empty
- ✗ Don't chase enemy into safe zone
- ✗ No random rallies — wait for signal
⏸️ On Cooldown
Watch map → report enemy teleports → spot empty cities → tell HAVOC
Quick Commands
Paste in game chat
🛡️ HOLDDon't leave your building🔁 REINFORCE [building]Everyone available now⚔️ RALLY on [player]Join in 10 seconds🔥 BURN [player city]They stole our building — burn now🏁 PHASE 3Swordshrine push — follow STRIKE🎯 TARGET: [name]Focus this player NOW🐋 WHALE SPOTTED: [name]HAVOC intercept immediately
Pre-Match Checklist
Complete before battle starts